Dynamically Populating a Form From Drop-down Selection

Recently I was working on a project that was eventually supposed to culminate in creating a form where the drop-down option selected would result in the form fields being populated with previously saved data. I thought I’d try my hand at building out that action. I’ll go into the details and code of how it works below.

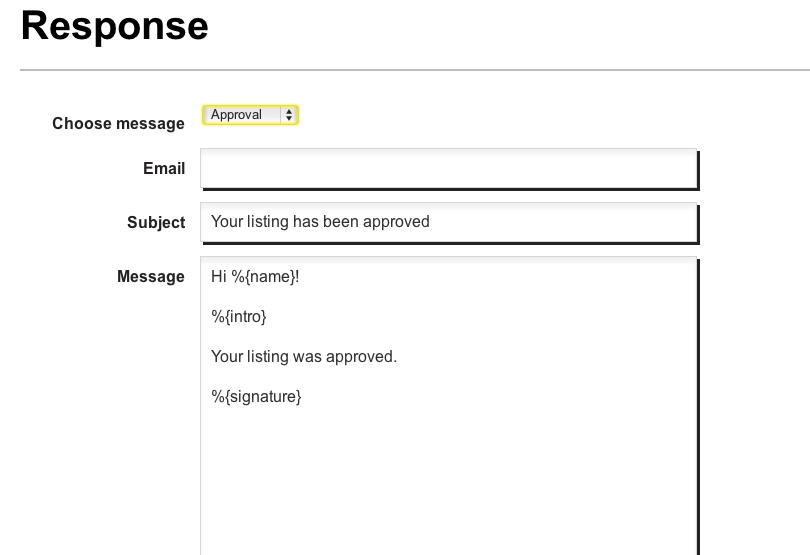
Here’s the form with the options you can select.

Drop-down Menu

When you’ve made your selection some of the form fields will populate with text as you can see here.

In order to create this ability, I wrote a method in the controller that responds with the data I need in JSON format. This is useful because jQuery has an ajax function called .getJSON, which will be used later. So the method I wrote looked something like this.

1
2
3
4
5
6
7
def update_chosen_response
  @response = Response.find_by_name(params[:name])

  respond_to do |format|
    format.json { render json: @response.to_json }
  end
end

The route needs to be changed so the we can query the database by name and not just id. We do that by adding the :name to the route so we’ll have that information in the params for use later.

1
match 'update_response/:name' => 'response#update_chosen_response', :as => 'update_chosen_response', :via => :get

Now we have a method that pulls the data we need (specifically the response subject and message) and outputs it in JSON. We also have a route that allows us to pass the name of the response selected through params so we can pull the correct data. Now we can move onto the jQuery.

1
2
3
4
5
6
7
8
$('#response_category').change(function() {
  var option = $('#response_category').val();
  $.getJSON('/manage/update_response/' + option, function(data) {
    $('#response_subject').val(data.subject);
    $('#response_body').val(data.message)
  })
  return false;
});

The first line of code is a change event for when an option is selected from the drop-down menu. The second line defines the variable that is used in the next line to pass the option name to params. You’ll see the .getJSON method I mentioned earlier, which we use here to call the update_chosen_response method. Then just specify the form fields that will be affected and use .val to pass along the returned data that will populate them.

Hopefully this was helpful!

Exploring Sorting Algorithms

Being able to sort a collecion of data is a fundamental part of programming. There are a variety of ways a collection can be sorted and we’ll look at a handful of the most common sorting algorithms. Generally they are differentiated by their efficiency, stability (whether the sort preserves the original order of keys with equal values), and space requirements. Ruby’s native .sort method uses the quicksort algorithm so let’s start with that one.

Also if you feel dance will help you better understand sorting algorithms I highly recommend checking out the Algorythmics. I, for one, found them highly educational about sorting and folk dance.

Quicksort

Quicksort is a divide and conquer algorithm in that it divides a larger list into sublists. The lists are made around the pivot (the red bar above). The elements greater than the pivot are in one sublist while all lower elements are in the other sublist. This pattern of organizing around a pivot then occurs recursively on the increasingly smaller sublists until they are all sorted. Here is a nice look at implementing quicksort in ruby over a few implementations.


Merge Sort

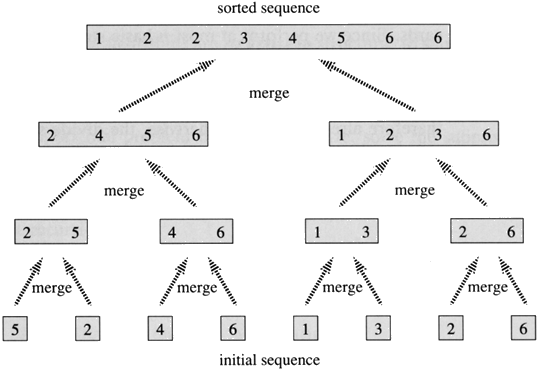
With merge sort you divide the unsorted list of n items into n sublists. Now each sublist will only have one element in it and the sublists get merged back together to produce new sublists that are ordered. They increase in size until they have all been merged back into one ordered list. You can see the process below and read more about it here.


Bubble Sort

Bubble sort works better for smaller lists. It gets very time consuming with larger lists. This is because bubble sort goes through the list and compares each adjacent item. If the pair is out of order, it switches them. Once at the end of the list it starts over and iterates over the list again, swapping adjacent items until the list is finally completely sorted.


Insertion Sort

Insertion sort takes advantage of the existing order of the input, which makes it adaptive. Like bubble sort, insertion sort is more efficient with smaller data sets. It takes the input list and goes over each element one at a time as it creates a growing sorted output list. This repeats until there are no unsorted input elements left, only sorted output elements. This sorting occurs in-place so if the next element is already the greatest one that the sort has reached, it remains in the same spot as seen above. This makes it a stable sorting algorithm as well.

Ruby Algorithms is a great resource for seeing how these algorithms can be implemented in ruby and also a way to gague when you should use which one. You can use their benchmark suite to see what would be most efficient where. Definitely worth taking a look at.

Mailgun and Your Rails App

There are a lot of email services that allow you to send emails and then look at statistics like open and click-through rates. It’s very easy to get these stats for yourself personally. However sometimes you want to give others access to them as well. It’s not like you can send around your email service password and let everyone check the dashboard whenever they’re curious. Here’s one way to make open and click-through rates available directly in your app.

Theoretically you could build all sorts of information tracking into the email itself. 1x1 pixel images that load when an email is opened so you can track email open rates. Custom urls to check click-thru rates. But since there are services that do this for you already, I’ll be using Mailgun here. According to Mailgun there are three ways to access the tracking data from your emails.

  1. Control Panel: There are summary tracking stats, tables with event details and campaign reports.

  2. HTTP API: You can programmatically access event data and tracking stats.

  3. Events: Mailgun can perform an HTTP request into your application when an event occurs.

The third one is of interest since it can send the data you want directly to your app. If you’re using SMTP already, you won’t even need to change your configuration much except to put in your Mailgun info. For the app I was working on, we needed to keep track of click-through rates for links that users emailed to other memebers in their group. So to start I somehow had to get Mailgun to perform an HTTP POST request whenever a specific event (link was clicked) occurred. This was actually pretty easy in Mailgun. You just provide them with a callback URL and then set that URL up as a route in your app that hits a specific event.

1
match '/email/mailgun' => 'stats#create'

Look at us using webhooks!

Now that the callback URL was set up we needed to somehow get the user ID and article ID passed from our app to Mailgun, to the email recipient, back to Mailgun, who would then send it back to us. There was no point in having statistics if we couldn’t tell who they were for. Reading through Mailgun’s documentation will reveal that there are custom MIME headers that can be used for this purpose. According to the documentation X-Mailgun-Variables can be used to attach custom JSON data to the message. So in the mailer you can manually set the variables in the header.

1
headers['X-Mailgun-Variables'] = {:article_id => @article.id, :user_id => user.id}.to_json

Now when the event triggers the HTTP POST request to our app we can access the ID of the user the email was sent to as well as the ID of the article they were sent so we can save that data in our database.

1
2
3
4
5
6
7
8
9
10
11
  def create
    event = params[:event]
    if event == 'opened'
      stats = Stat.where(:user_id => params[:user_id], :article_id => params[:article_id]).first
      stats.opens = 1
    elsif event == 'clicked'
      stats = Stat.where(:user_id => params[:user_id], :article_id => params[:article_id]).first
      stats.clicks = 1
    end
    stats.save
  end

Once the data is saved, we’re able to access it anytime and display it for users who now know exactly who has and hasn’t clicked the link in the email they were sent.

How to Let Users Invite Friends to Their Groups

Say you want to build a service where people can invite others to a specific group or team or project. Not an entirely uncommon idea. What do you use to build that invitation system? There’s devise_invitable, but unless you want to spend hours breaking apart the code because it’s never going to work to the exact specifications you have in mind, you might as well build your own from scratch.

So you have a bunch of users already and they’re trying to invite people to their groups/teams/projects. There are a few possible scenarios for what will happen and some fairly common edgecases to watch out for. The most straightforward use-case is when the user sends out a group invite to a new recipient, the recipient receives it, and signs up on the site. The recipient then becomes a user and all that’s needed on the backend is for their data to be added to the users table and for the association between them and the group to be created.

Sweet and easy. I think I’ll go pat myself on the back and have some pie.

But wait.

What happens if they’re a user already? Well, ok maybe we’ll just check for that first that way if they are we can take note. Then we can send them an invite letting them know and they’ll see the group they’re invited to when they log in. Maybe something like this.

1
2
3
4
5
6
7
8
  def user_already_exists?(recipient_email)
    member =  User.find_by_email(recipient_email)
    if member
      self.user_id = member.id
    else
      send_invite
    end
  end

No harm, no foul! Now onto pie.

Hmm, but what if the invitation wasn’t sent to the email that their account is under?

Ahh, and now things are getting a bit more complicated. How will we know that the recipient of the invitation is the same as the user who eventually signs up if they use a different email? Maybe email isn’t the best identifier then. We’ll need something that can be passed from the invitation back to our application that way we’ll have an identifier that is unlikely to change. Let’s go with a randomly generated token that we’ll use in the urls we send. That way if they do sign up or log in under a different email we can still tell what group the user was invited to.

1
2
3
def generate_token
    self.invitation_token = Digest::SHA1::hexdigest([Time.now, rand].join)
end

Good job. Pie now?

Nope, because there’s still the possibility that a person may be invited to multiple groups before they’ve accepted any invitations. We want to be able to display all the groups they’re invited to so how do we make sure the invitations can be grouped together? In reality, this isn’t something we can guarantee, but we can try to catch as many situations as possible by checking to see if the email the invitation is being sent to is already on the invitation table.

1
2
def check_invitation_table_for_email(recipient_email)
    invitations = Invitation.where({:email => recipient_email})

Hey! This email is so lets just take the token already generated and use it for the second group invitation. Now when the recipient visits the website to either log in or sign up we’ll be able to find all groups they were invited to either by their email or the invitation token and we can display all those groups for them.

While we’re at it why don’t we deal with the possibility of someone being invited to the same group multiple times. Maybe her friends really want her to join their group. Well she still only needs one invitation in our table and only one token. So when we check to see if the email is in the invitation table already let’s check to see if the group id is the same as well. If it is, we’ll just ignore and if not then we’ll add the new group invite.

1
2
3
4
5
6
7
8
9
10
11
if invitations != []
      invitations.each do |invitation|
        if invitation.group_id == self.group_id
          self.group_id = nil
        else
          self.invitation_token = invitation.invitation_token
        end
      end
    else
      new_invitation(recipient_email)
    end

Once we put everything together we should have a fairly solid system that deals with a some of the most common possibilities. It’ll look something like this:

1
2
3
4
5
6
7
8
9
10
11
12
13
14
15
16
17
18
19
20
21
22
23
24
25
26
27
28
29
30
31
32
33
def user_already_exists?(recipient_email)
    member =  User.find_by_email(recipient_email)
    if member
      self.user_id = member.id
    else
      check_invitation_table_for_email(recipient_email)
    end
  end

  private
  def check_invitation_table_for_email(recipient_email)
    invitations = Invitation.where({:email => recipient_email})
    if invitations != []
      invitations.each do |invitation|
        if invitation.group_id == self.group_id
          self.group_id = nil
        else
          self.invitation_token = invitation.invitation_token
        end
      end
    else
      new_invitation(recipient_email)
    end
  end

  def new_invitation(recipient_email)
    generate_token
    self.email = recipient_email
  end

  def generate_token
    self.invitation_token = Digest::SHA1::hexdigest([Time.now, rand].join)
  end

Refactoring and pie to follow.

Using Action Mailer: The Basics

Action Mailer is a wrapper for Action Controller and the Mail gem. It’s used to send emails from your app. It works very well for automatated emails like welcome emails and confirmation emails.

There is some set up before actually being able to send an email. In the config/environments/appropriateenvironmentfile.rb file you’ll need to give the correct specifications for the Action Mailer configuration.

1
2
3
4
5
6
7
8
9
config.action_mailer.delivery_method = :smtp
config.action_mailer.smtp_settings = {
  :address              => "smtp.gmail.com",
  :port                 => 587,
  :domain               => 'baci.lindsaar.net',
  :user_name            => '<username>',
  :password             => '<password>',
  :authentication       => 'plain',
  :enable_starttls_auto => true  }

The example above uses smtp as the delivery method, but other options include sendmail, test, and file. The latter two are generally used during development. Test saves an array of emails sent and is useful during functional and unit testing while file causes Action Mailer to write the email to a file in the tmp/mails directory. SMTP (Simple Mail Transfer Protocol) is the protocol for sending email while sendmail is one of the applications that can send mail through SMTP standards as well as other mail transfer protocols. Choosing SMTP means you have to supply an SMTP server (visible above) while with sendmail it is your local machine that is acting as the server.

After configuring Action Mailer you should be able to send an email, but before you do, you’ll need a mailer. You generate a mailer in the same way you would generate any other rails resource.

1
rails generate mailer UserMailer

The mailer, views, and tests will be generated for you. The information for the email you want to send goes in the mailer. So we can define a confirmation email in our mailer below.

1
2
3
4
5
6
7
8
9
class UserMailer < ActionMailer::Base
  default :from => "info@example.com"

  def confirmation_email(user)
    @user = user
    @url  = "http://example.com"
    mail(:to => user.email, :subject => "Thanks for signing up!")
  end
end

To have something to render in the email, the views need to be set up as well. You should create both an email view in erb/html and text. They will go in app/view/invitation_mailer and the text file should be named invitation_email.text.erb while the html file is named invitation_email.html.erb.

Assuming you already have a Users controller, now it’s time to tell it when to send the email. Since in this case, we’re sending an email to confirm their signing up at our site, we want the email sent when the user is created. This occurs when the user is saved during create in the Users controller. In the create method we can tell it to send the email if the user is saved like so:

1
2
3
4
5
def create
    @user = User.new(params[:user])

if @user.save
        UserMailer.confirmation_email(@user).deliver

At this point you are now able to send an email from your app. There are tons of ways to extend the functionality of Action Mailer though and we’ll get into that in later posts.

Awesome CSS

A quick post about some very cool CSS you can find online because I was too busy helping build Jane’s Lunch to write an in-depth post. Sorry! In any case, CSS Totoro welcomes you.

Pure CSS Totoro by @jacksaidwhat

CSS is awesome and I don’t even mean it ironically. Sure there are flashier languages, but CSS seems like a lot of fun. You get to see immediate changes to whatever you’re working on and you can make so many cool things with it!

For instance, check out these logos made from only one div tag and some CSS. One of my favorites is this mug:

1
2
3
4
5
6
7
8
9
10
11
12
13
14
15
16
17
18
19
20
21
22
23
24
25
26
27
28
29
30
31
32
33
34
35
36
37
38
39
40
41
42
43
44
.mug_animate {
  -webkit-box-shadow: inset 0 -3em 0 0 #2C2C2C;
  box-shadow: inset 0 -3em 0 0 #2C2C2C;
  margin: 0 auto;
  margin-bottom: 1em;
  height: 2.5em;
  margin-top: 1.25em;
  position: relative;
  width: 1.5em;

  -webkit-transition: all 1000ms linear;
  -moz-transition: all 1000ms linear;
  -o-transition: all 1000ms linear;
  -ms-transition: all 1000ms linear;
  transition: all 1000ms linear;
}

.mug_animate:after {
  border: .25em solid #2C2C2C;
  border-right: none;
  border-radius: .75em 0 0 .75em;
  content: '';
  height: 1.5em;
  left: -1em;
  position: absolute;
  top: .25em;
  width: .75em;
}

.mug_animate:before {
  border-radius: 0 0 0.2em 0.2em;
  top: -0.5em;
  left: -0.25em;
  position: absolute;
  border: 0.25em solid #2C2C2C;
  height: 2.5em;
  width: 1.5em;
  content: "";
}

.mug_animate:hover {
  -webkit-box-shadow: inset 0 0em 0 0 #2C2C2C;
  box-shadow: inset 0 0em 0 0 #2C2C2C;
}

You can also create a variety of image filters, which is explained here. You can check it out and start editing all your photos directly using CSS!

CSS

Reasons to Try the ‘Harsh’ Compass Extension

CSS3 has made it easier than ever to create tons of really cool and interesting effects, especially with an open-source framework like Compass. Harsh is a Compass extension that creates CSS3 gradients with, that’s right, harsh color stops. Or subtle ones if that’s your thing. I’m glad I found it and tried it out. Here are a few reasons why.

  1. It’s easy! Unless you’re like me and have next to no experience with CSS, but as long as you’re not, it’s totally easy! To incorporate it into an octopress blog I added the gem to the gemfile.

    (gemfile) download
    1
    2
    3
    4
    5
    6
    7
    8
    9
    10
    11
    12
    13
    14
    15
    16
    17
    18
    19
    
    source "http://rubygems.org"
    
    group :development do
      gem 'rake', '~> 0.9'
      gem 'rack', '~> 1.4.1'
      gem 'jekyll', '~> 0.12'
      gem 'rdiscount', '~> 1.6.8'
      gem 'pygments.rb', '~> 0.3.4'
      gem 'RedCloth', '~> 4.2.9'
      gem 'haml', '~> 3.1.7'
      gem 'compass', '~> 0.12.2'
      gem 'rubypants', '~> 0.2.0'
      gem 'rb-fsevent', '~> 0.9'
      gem 'stringex', '~> 1.4.0'
      gem 'liquid', '~> 2.3.0'
    end
    
    gem 'sinatra', '~> 1.3.3'
    gem "harsh", "~> 1.0.0"
    
    And, per the config.rb instructions, I required my new compass plugin like so.

    (config) download
    1
    2
    3
    
    # Require any additional compass plugins here.
    project_type = :stand_alone
    require "harsh"
    
    Then to use it I included it in the _styles.scss file like any CSS element except with the mixin syntax.

    (harsh_header) download
    1
    2
    3
    
    header[role="banner"] {
      @include harsh($transparency: .8);
    }
    

  2. If you haven’t used mixins before, this is a pretty cool way to start. Mixins let you create chunks of CSS that can be easily reused. I find this especially useful in the case of gradients as they can be time-consuming to build. For instance the above header code would actually be much longer without using the harsh mixin. Seriously, like absurdly longer.

    (unharsh_header) download
    1
    2
    3
    4
    5
    6
    7
    
    header[role="banner"] {
      background: -webkit-gradient(linear, 65% 16%, 35% 84%, color-stop(45%, rgba(228, 136, 242, 0.2)), color-stop(45.0%, transparent)), -webkit-gradient(linear, 60% 78%, 40% 22%, color-stop(3%, rgba(1, 31, 113, 0.2)), color-stop(3.0%, transparent)), -webkit-gradient(linear, 89% 34%, 11% 66%, color-stop(65%, rgba(50, 52, 43, 0.2)), color-stop(65.0%, transparent)), -webkit-gradient(linear, 87% 71%, 13% 29%, color-stop(31%, rgba(65, 115, 22, 0.2)), color-stop(31.0%, transparent)), -webkit-gradient(linear, 25% 14%, 75% 86%, color-stop(38%, rgba(38, 189, 67, 0.2)), color-stop(38.0%, transparent)), -webkit-gradient(linear, 13% 36%, 87% 64%, color-stop(21%, rgba(27, 194, 16, 0.2)), color-stop(21.0%, transparent)), -webkit-gradient(linear, 7% 25%, 93% 75%, color-stop(59%, rgba(209, 164, 155, 0.2)), color-stop(59.0%, transparent)), -webkit-gradient(linear, 90% 86%, 10% 14%, color-stop(25%, rgba(175, 225, 97, 0.2)), color-stop(25.0%, transparent)), -webkit-gradient(linear, 18% 29%, 82% 71%, color-stop(52%, rgba(62, 145, 240, 0.2)), color-stop(52.0%, transparent)), -webkit-gradient(linear, 66% 68%, 34% 32%, color-stop(40%, rgba(193, 119, 226, 0.2)), color-stop(40.0%, transparent)), white;
      background: -webkit-linear-gradient(65% 16%, rgba(228, 136, 242, 0.2) 45%, transparent 45.0%), -webkit-linear-gradient(60% 78%, rgba(1, 31, 113, 0.2) 3%, transparent 3.0%), -webkit-linear-gradient(89% 34%, rgba(50, 52, 43, 0.2) 65%, transparent 65.0%), -webkit-linear-gradient(87% 71%, rgba(65, 115, 22, 0.2) 31%, transparent 31.0%), -webkit-linear-gradient(25% 14%, rgba(38, 189, 67, 0.2) 38%, transparent 38.0%), -webkit-linear-gradient(13% 36%, rgba(27, 194, 16, 0.2) 21%, transparent 21.0%), -webkit-linear-gradient(7% 25%, rgba(209, 164, 155, 0.2) 59%, transparent 59.0%), -webkit-linear-gradient(90% 86%, rgba(175, 225, 97, 0.2) 25%, transparent 25.0%), -webkit-linear-gradient(18% 29%, rgba(62, 145, 240, 0.2) 52%, transparent 52.0%), -webkit-linear-gradient(66% 68%, rgba(193, 119, 226, 0.2) 40%, transparent 40.0%), white;
      background: -moz-linear-gradient(65% 16%, rgba(228, 136, 242, 0.2) 45%, transparent 45.0%), -moz-linear-gradient(60% 78%, rgba(1, 31, 113, 0.2) 3%, transparent 3.0%), -moz-linear-gradient(89% 34%, rgba(50, 52, 43, 0.2) 65%, transparent 65.0%), -moz-linear-gradient(87% 71%, rgba(65, 115, 22, 0.2) 31%, transparent 31.0%), -moz-linear-gradient(25% 14%, rgba(38, 189, 67, 0.2) 38%, transparent 38.0%), -moz-linear-gradient(13% 36%, rgba(27, 194, 16, 0.2) 21%, transparent 21.0%), -moz-linear-gradient(7% 25%, rgba(209, 164, 155, 0.2) 59%, transparent 59.0%), -moz-linear-gradient(90% 86%, rgba(175, 225, 97, 0.2) 25%, transparent 25.0%), -moz-linear-gradient(18% 29%, rgba(62, 145, 240, 0.2) 52%, transparent 52.0%), -moz-linear-gradient(66% 68%, rgba(193, 119, 226, 0.2) 40%, transparent 40.0%), white;
      background: -o-linear-gradient(65% 16%, rgba(228, 136, 242, 0.2) 45%, transparent 45.0%), -o-linear-gradient(60% 78%, rgba(1, 31, 113, 0.2) 3%, transparent 3.0%), -o-linear-gradient(89% 34%, rgba(50, 52, 43, 0.2) 65%, transparent 65.0%), -o-linear-gradient(87% 71%, rgba(65, 115, 22, 0.2) 31%, transparent 31.0%), -o-linear-gradient(25% 14%, rgba(38, 189, 67, 0.2) 38%, transparent 38.0%), -o-linear-gradient(13% 36%, rgba(27, 194, 16, 0.2) 21%, transparent 21.0%), -o-linear-gradient(7% 25%, rgba(209, 164, 155, 0.2) 59%, transparent 59.0%), -o-linear-gradient(90% 86%, rgba(175, 225, 97, 0.2) 25%, transparent 25.0%), -o-linear-gradient(18% 29%, rgba(62, 145, 240, 0.2) 52%, transparent 52.0%), -o-linear-gradient(66% 68%, rgba(193, 119, 226, 0.2) 40%, transparent 40.0%), white;
      background: linear-gradient(65% 16%, rgba(228, 136, 242, 0.2) 45%, transparent 45.0%), linear-gradient(60% 78%, rgba(1, 31, 113, 0.2) 3%, transparent 3.0%), linear-gradient(89% 34%, rgba(50, 52, 43, 0.2) 65%, transparent 65.0%), linear-gradient(87% 71%, rgba(65, 115, 22, 0.2) 31%, transparent 31.0%), linear-gradient(25% 14%, rgba(38, 189, 67, 0.2) 38%, transparent 38.0%), linear-gradient(13% 36%, rgba(27, 194, 16, 0.2) 21%, transparent 21.0%), linear-gradient(7% 25%, rgba(209, 164, 155, 0.2) 59%, transparent 59.0%), linear-gradient(90% 86%, rgba(175, 225, 97, 0.2) 25%, transparent 25.0%), linear-gradient(18% 29%, rgba(62, 145, 240, 0.2) 52%, transparent 52.0%), linear-gradient(66% 68%, rgba(193, 119, 226, 0.2) 40%, transparent 40.0%), white;
    }
    
    Essentially a mixin sets up a code pattern as a variable that you can then mix into the rest of your code so there’s no need to type out or ever copy paste code that you’re going to need multiple times. This significantly cuts down on the amount of code you need.

  3. The Harsh property takes a number of different attributes so you have a lot of control over the end result.

    @include harsh($color, $background, $transparency, $number-of-gradients, $angle, $nuance, $nuance-strength)

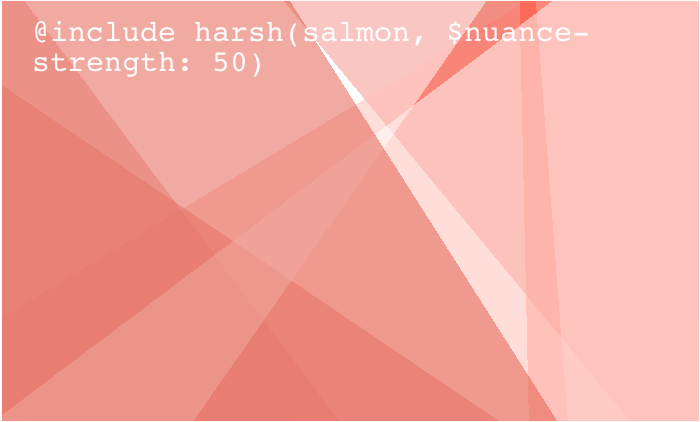
    Harsh Salmon

    Even just using a couple of the attributes can give you something interesting.

    If you don’t specify any colors the element defaults to random, which I actually prefer because there’s something kind of nice about letting the backgrounds on your blog be randomly generated.

  4. Doesn’t it remind you of one of those drawings you made in MS Paint as a kid with all the random triangles that you filled in? But like way classier? Also, how cool is it that you can have in a couple steps something that would typiclly be pretty tedious to manually create?

I’m glad I stumbled across Harsh because I learned a lot while trying to figure it out. This process of discovery, attempted implementation, and multiple failures before success has been fundamental to my experience coding thus far. It definitely keeps things interesting!

Coding and Self-Realization

Whenever you set off on the process of learning something new, you’re also in a great position to learn some pretty profound things about yourself. I’m sure those will come to me eventually as I’m learning to code, but so far the really big thing I’ve learned is that I seriously cannot function without a good chunk of sleep each night.

I mean it. Learning to program requires so much concentration and this is especially true at the Flatiron School. Everyday we’re learning and working from 9 to at least 6 in the classroom and then we all go home and do some more. So not sleeping enough is a mistake I plan on only making once. Seriously, it was zombie bad the next day and with the speed we’re learning at, missing anything can set you back significantly. Plus why would I want to miss any of Avi’s bon mots? I don’t and you shouldn’t either. Sleep is key…and the value is learning stuff (Whoa, hash jokes already!).

In a similar vein, I’ve discovered that it’s also incredibly important to prioritize. I could spend an endless amount of time doggedly pursuing the answer to a single, frustrating question, but sometimes I have to stop because of that aforementioned sleep thing. For those who can sleep very little and function at full-speed regardless, I salute you (but seriously, don’t you enjoy sleep? It’s like so awesome. As are beds.) For me, I’m just hoping to prevent burnout before this 12-week adventure is over.

And So It Begins

Getting things together and coding up a storm.